3D Cubes; Or, Programmatically Selecting Parts Of A Cube In Blender’s Geometry Nodes
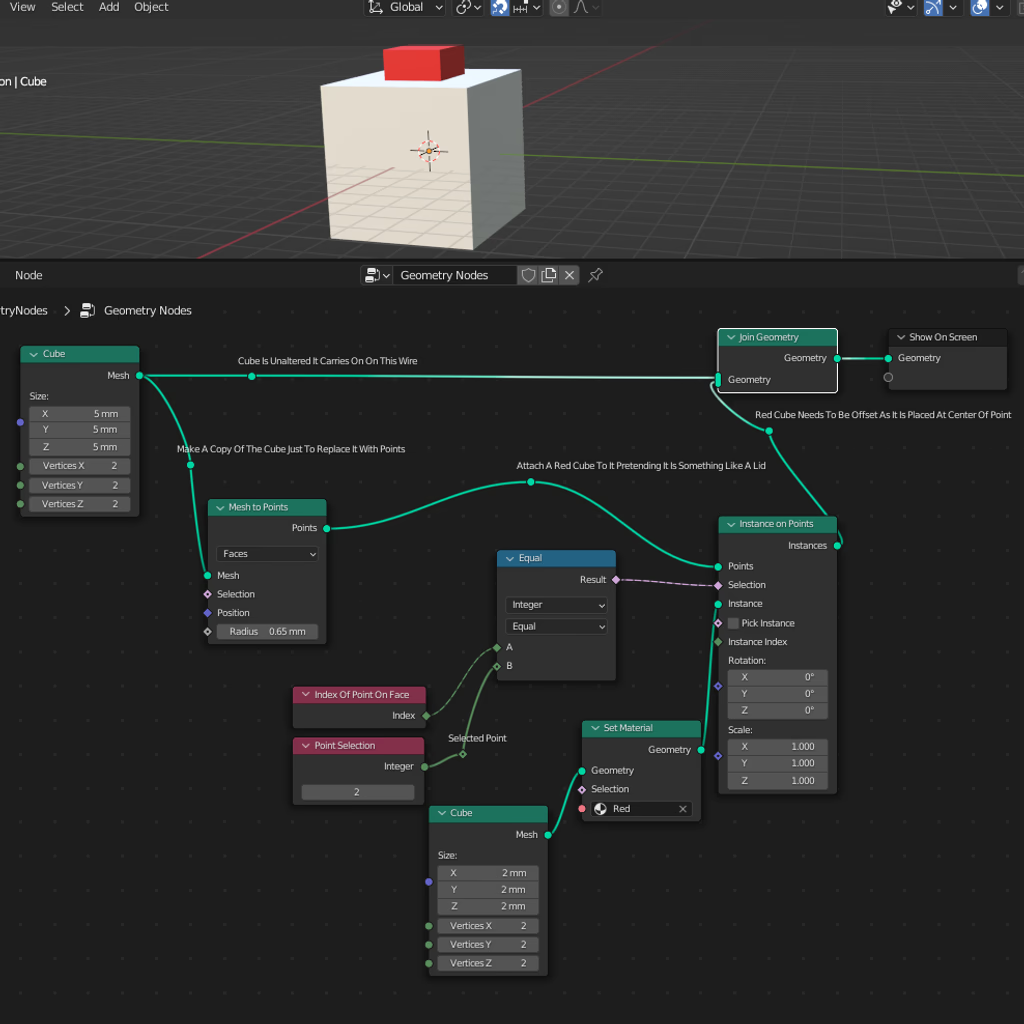
I just figured out how to identify locations of parts of a cube,
you have to create a point cloud around the cube.
A point is a really primitive idea,
and it does not show up in the finished product.
But it serves as a very valuable anchor,
a point is just X,Y and Z, also called a vector.
And Geometry Nodes,
are all about vectors.
Just to clarify, a point can’t help you manipulate the cube,
it is just a thing that gets glued on top of the cube.
It is a useful concept,
for attaching things to a cube.
You don’t have to calculate the vector or XYZ,
of the center of the face of a cube, because you can put a point there.
And if you resize the cube,
by giving it new dimensions that point will update its XYZ, or vector.
When I was making the Superhero belt hinge,
I used a curve line - another invisible primitive.
It is basically the string of a necklace,
there you say what you want on it.
It came as a bit of a surprise to me,
that unlike the more complex and visible meshes...
The line asked for the start point and end point,
it asked for the two vectors that edges of a cube have.
That is really convenient,
because the Mesh to Points Node delivers exactly that.
The points or XYZ vectors, have an ID number,
that I have to locate by hand, but that is OK.
I wrap my initial cube operations in a Group,
or a custom cube component.
And this allows me to give it custom properties,
so here I can create.
Start Of Bottom Hinge and End of Bottom Hinge,
and Start Of Top Hinge, and End Of Top Hinge.
And this will return the four Vectors,
that I will then feed into my hinge creation group.
Being able to select parts of a cube,
is a huge deal for creating objects for 3D printing.
It is a huge deal for programming 3D geometry,
the Point Cloud, is basically the mouse.
The mouse that is no longer available to you,
because you are no longer editing an object.
But programming one,
so you can’t really click on it.
Just to clarify, normally 3D cube,
is represented by three categories of things.
Vertices which mark the corners,
edge-lines, which connect the vertices together in the correct way to make a kind of a wire-frame.
And then faces,
which specify what parts of the wire-frame are filled.
If you wanted to move a corner of a cube up,
you don’t worry about the lines or face.
You just move the vertex,
and the edge-lines and faces recalculate.
If you wanted to move the lower side of a cube,
to make a primitive shoe shape, you move the edge-line connecting the vertices.
So that you don’t have to worry about aligning the vertices,
moving the edge-line will take care of that for you, and update the face.
If you want to stretch a cube upwards,
you just grab the face and pull up.
This will move all four vertices,
and all four edge-lines for you.
Vertices, Edges, and Faces,
represent a useful concept for operating on 3D geometry.
When you are programming a cube,
all these concepts still apply.
But you don’t really model a cube,
you create one with the correct dimensions.
To adjust things that go on top of a cube,
you may use a point cloud.
This will cause your additions to automatically move,
when you change the cube, because points mark abstract areas on a cube.
They can be glues to the middle of a face,
the middle of an edge line, or exactly where the vertex is.
To programmatically make a cube change its size,
based on what I know, at this time in Blender’s development.
You can only address a vertex or the corners of a cube,
so if you want to pull the top of a cube up.
You have to know the index numbers of all four vertices,
it is probably, 0,1,2,3 for the bottom, and 4,5,6,7 for top.
But I suspect in the future version of Blender,
you will be able to reference faces and edges.
It really simplifies the Math,
and makes the graph tree, the visual programming much more readable.